
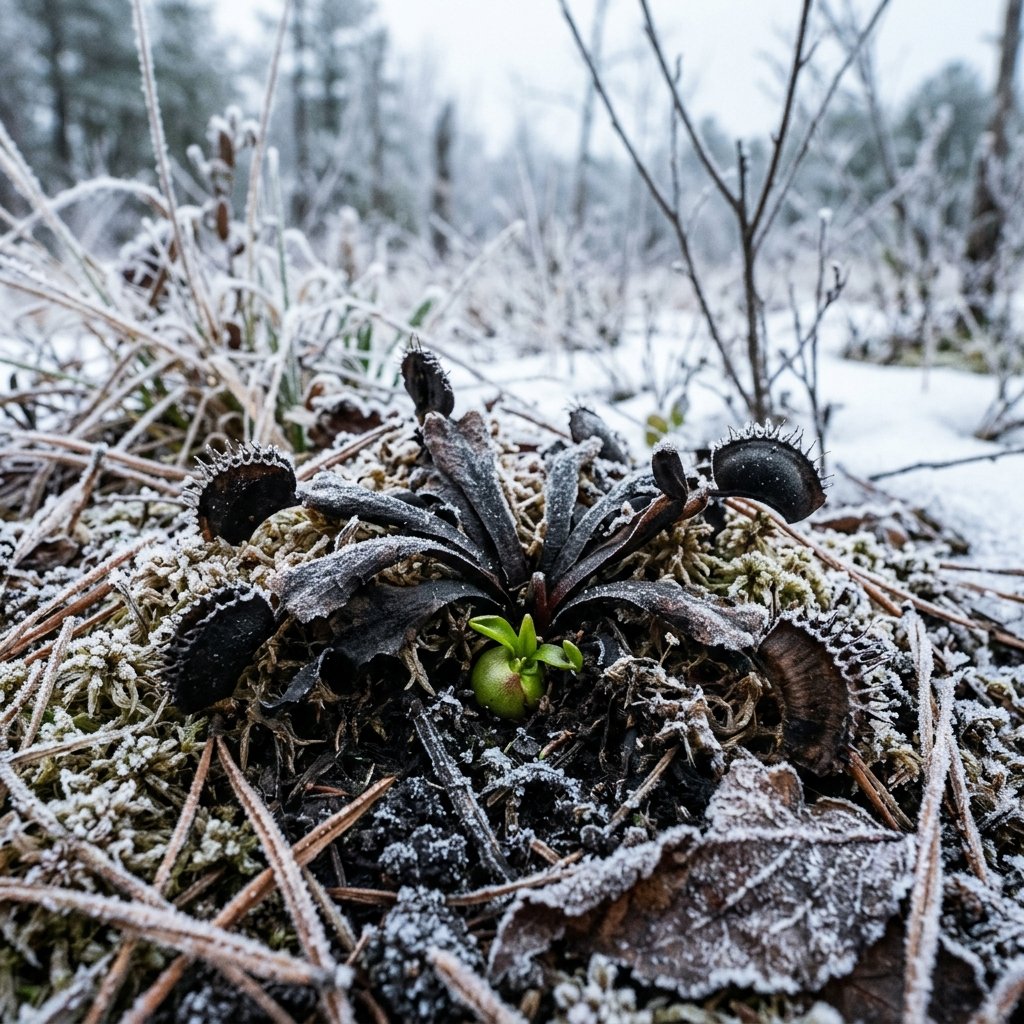

Every November, panicked beginners flood plant forums with pictures of their Venus Flytraps turning black, shriveling up, and collapsing against the soil. Convinced they killed the plant, they throw it in the trash. They just threw away a perfectly healthy plant that was entering its mandatory, biological Winter Dormancy.
The Fallacy of the Tropical Flytrap
Because they look like alien monsters, people assume Venus Flytraps (Dionaea muscipula) are from the deep Amazon rainforest. They are not. They are native to one specific place on Earth: the coastal bogs of North and South Carolina. They experience freezing temperatures, snow, and harsh winters. They are temperate plants.
The Dormancy Requirement
- A Venus Flytrap requires a 3 to 4 month period of cold temperatures (between 35°F and 50°F) and shorter daylight hours every single year.
- If you keep a Flytrap inside your 70°F living room year-round, it will skip dormancy. It will exhaust its energy reserves by spring and die of exhaustion within two years.
How to Execute “The Fridge Hack”
If you live in a climate where it freezes solid outside (which will freeze the roots in a pot), or an apartment where it’s always warm, you must force dormancy.
In November, spray the soil surface with a sulfur-based fungicide, place the entire potted Flytrap inside a sealed Ziploc bag, and put it in the crisper drawer of your refrigerator. Ignore it. The darkness and consistent cold simulate a North Carolina winter perfectly. In March, take it out, place it under intense sunlight, and watch it explode with massive, terrifying new traps.
The 2026 Comprehensive Masterclass: Botanical Deep Dive
To truly understand the nuances of the concepts discussed above, we must transition from basic houseplant care to advanced botanical mechanics. Elite plant collectors do not rely on guesswork; they rely on environmental control, photobiology, and soil chemistry. In this masterclass section, we will systematically unpack the advanced science necessary to maintain a hyper-optimized indoor jungle.
Part 1: The Physics of Lighting and Photobiology
Lighting is the fundamental engine of biological growth. Without adequate Daily Light Integral (DLI) and Photosynthetic Photon Flux Density (PPFD), any adjustments made to watering or fertilizing are entirely useless. When you place a plant in a corner, you are not just dimming its environment; you are actively starving it.
Understanding PAR and PPFD
Photosynthetically Active Radiation (PAR) designates the spectral range (wave band) of solar radiation from 400 to 700 nanometers that photosynthetic organisms are able to use in the process of photosynthesis. PPFD measures the amount of PAR that actually arrives at the plant. It is measured in micromoles per square meter per second (μmol/m²/s).
- Low-Light Plants (e.g., Snake Plants, ZZ Plants): Require a PPFD of 20 to 50 μmol/m²/s. While they survive here, they will rarely trigger massive new growth.
- Medium-Light Plants (e.g., Calatheas, Philodendrons): Require a PPFD of 50 to 150 μmol/m²/s. At this range, they begin to express deeper variegation colors and stronger petiole rigidity.
- High-Light Plants (e.g., Monsteras, Ficus, Cacti): Require a baseline of 200 to 400+ μmol/m²/s to exhibit maximum fenestration (leaf holes) and secondary branching.
Part 2: Soil Chemistry, CEC, and Hydrophobicity
Your potting mix is not just a physical anchor for your plant; it is a bio-active chemical reactor. The most critical metric in any soil mix is its Cation Exchange Capacity (CEC).
Cation Exchange Capacity Explained
CEC is the measure of a soil’s ability to hold and release various elements and compounds through electrical charges. Highly organic materials like Peat Moss and Coco Coir have a very high CEC, meaning they grab onto fertilizer molecules (like Nitrates and Phosphates) and hold them so the roots can slowly feed over time. This is why placing a plant purely in gravel (which has a CEC of nearly zero) requires constant, daily nutrient flushing (hydroponics).
The Hydrophobic Death Trap
When high-CEC soils, particularly peat moss, dry out entirely, they undergo a mechanical failure known as hydrophobicity. The organic fibers shrink and lock tightly together. When water is introduced, the surface tension is too high to penetrate the locked fibers. The water channels directly down the sides of the pot. To break the hydrophobic barrier, you must use a surfactant (like a mild dish soap solution) or submerge the pot entirely for 45 minutes to force capillary hydration upward against gravity.
Part 3: Advanced Hydration Dynamics (Capillary Action)
Water does not simply flow downward. In the micro-environment of a plant pot, capillary action often overcomes gravity.
The Perched Water Table (PWT): No matter how much drainage you place at the bottom of a container, the lowest contiguous section of soil will always remain identically saturated. This is physics. If you put 3 inches of rocks at the bottom of a pot, you do not improve drainage; you merely push the soggy PWT three inches higher into the root mass, radically increasing the risk of Pythium (root rot). This is why nursery pots with numerous drainage holes placed directly on a porous surface are the only empirically sound container choice.
Part 4: The Pathogen War (Fungal vs Bacterial)
When a plant fails, the visual symptom (yellowing, dropping leaves) is merely the final stage of a prolonged microscopic war.
Anaerobic Pathogens
When a soil is over-hydrated, oxygen molecules are physically displaced by water molecules. Roots require oxygen to respire. As roots suffocate, the cells burst and die. This dead tissue becomes an immediate food source for anaerobic bacteria—bacteria that thrive strictly in zero-oxygen environments. The bacteria consume the dead roots, creating a sulfurous, rotting odor. To combat this, elite growers use Hydrogen Peroxide (H2O2) drenches. The extra, highly unstable oxygen atom in H2O2 detonates on contact, forcefully oxidating the anaerobic bacteria and re-oxygenating the root zone.
Part 5: Comprehensive Houseplant Glossary of Terms
To ensure absolute clarity for our readers, we have compiled an exhaustive glossary of the terms heavily utilized within the professional botanical sphere:
- Aroid: A common name for plants in the Araceae family, characterized by a spathe and spadix inflorescence (e.g., Philodendrons, Monsteras).
- Chlorosis: The yellowing of leaf tissue due to a lack of chlorophyll, often caused by nutrient deficiencies or root suffocation.
- Etiolation: The stretching and weakening of stems as a plant aggressively reaches toward a distant light source.
- Fenestration: The natural occurrence of holes or deep splits in the leaves of mature plants, designed to allow wind and light to pass through to the lower canopy.
- Node: The vital junction on a stem where leaves, aerial roots, and new growth points (eyes) emerge. A cutting without a node will never grow a new plant.
- Variegation: A genetic (chimeric) or viral mutation resulting in distinct zones of differently colored tissue (typically white or yellow) due to an absence of chlorophyll in those areas.
- Transpiration: The biological process by which a plant absorbs water through its roots and subsequently releases it as vapor through micro-pores (stomata) on its leaves.
Conclusion: The 2026 Shift in Plant Ownership
The era of buying a plant and hoping for the best is over. Modern houseplant ownership requires a foundational understanding of physics, chemistry, and biology. By tracking your PPFD, balancing your soil’s CEC, and actively managing the Perched Water Table, you ensure your indoor jungle moves from simple survival to massive, aggressive growth.
Frequently Asked Questions
What are the best conditions for this plant?
Most houseplants thrive in bright, indirect light with temperatures between 65-80F (18-27C). Ensure good drainage and water when the top inch of soil feels dry.
How often should I water?
Watering frequency depends on the plant species, pot size, and environment. A general rule is to check the soil moisture before watering. Overwatering is the most common cause of houseplant death.
What soil mix works best?
A well-draining mix of peat moss, perlite, and orchid bark works well for most tropical houseplants. Succulents prefer a grittier mix with more sand and perlite.
Quick Care Reference
| Factor | Requirement | Notes |
|---|---|---|
| Light | Bright indirect | Avoid direct afternoon sun |
| Water | When top inch dry | Reduce in winter |
| Humidity | 50-70% | Mist or use pebble tray |
| Temperature | 65-80F (18-27C) | Avoid cold drafts |
| Soil | Well-draining mix | Peat, perlite, bark |
| Fertilizer | Monthly (spring-summer) | Half-strength balanced |
Pro Tips for Advanced Dormancy Management
Leverage these experience-based insights to ensure your Venus Flytrap thrives through its essential winter rest and emerges stronger than ever.
1. The Rhizome Test: Differentiating Dormancy from Decline
An advanced grower knows that a truly dormant Venus Flytrap will have a firm, healthy rhizome (the bulb-like base). If you’re unsure whether your plant is merely dormant or succumbing to rot/stress, gently unpot it and inspect the rhizome. A healthy rhizome will be white to pale yellow and firm to the touch. A soft, mushy, or discolored (dark brown/black) rhizome, especially if accompanied by a foul odor, indicates rot. In dormancy, the outer leaves and traps may blacken and die back significantly, but the core should remain robust. If the rhizome is healthy, trim away dead foliage and repot, maintaining appropriate dormancy conditions. This hands-on inspection is often the definitive diagnostic for experienced growers, preventing premature discarding of a perfectly healthy, resting plant.
2. Gradual Environmental Nudging for Optimal Dormancy Induction
Avoid abrupt changes when ushering your Venus Flytrap into dormancy. Instead, mimic nature’s gradual shift over several weeks in late fall. For indoor growers, this means slowly reducing light exposure (both duration and intensity) and progressively decreasing ambient temperatures. Moving the plant to a cooler, less brightly lit room (e.g., a north-facing window, an unheated garage, or even a cool basement with minimal supplemental light) can initiate the process. Aim for consistent daytime temperatures between 35-55°F (2-13°C) and nighttime lows that dip towards freezing but avoid sustained hard freezes. This gentle, controlled transition minimizes shock and allows the plant to naturally prepare for its resting phase, leading to a more robust emergence in spring.
3. Post-Dormancy Vigilance: The Critical Reawakening Phase
As spring approaches and temperatures naturally rise, your Venus Flytrap will begin to stir. Look for subtle signs of new, small, light-green leaves emerging from the very center of the rhizome. This is a critical period requiring careful management. Gradually reintroduce brighter light and warmer temperatures; avoid immediate full sun exposure, which can easily scorch tender new growth. This is also when pests like aphids or fungus gnats, which might have been dormant themselves or hiding in the substrate, can exploit a plant’s recovering state. Inspect new growth meticulously for any signs of infestation. Ensure the potting medium remains consistently moist but never waterlogged. A successful, carefully managed reawakening sets the stage for vigorous growth and impressive trap development throughout the entire growing season.
Frequently Asked Questions About Venus Flytrap Dormancy
Can I skip dormancy for my Venus Flytrap?
While technically possible to keep a Venus Flytrap in continuous growth under specific artificial conditions (e.g., year-round warm temperatures and long photoperiods), it is highly detrimental to the plant’s long-term health and vitality. Venus Flytraps are temperate plants native to bog environments in North and South Carolina, where they naturally experience cold winters. This dormancy period is essential for the plant to conserve energy, repair cellular damage, and reset its metabolic processes. Skipping dormancy will severely weaken the plant over time, leading to stunted growth, reduced trap production, increased susceptibility to pests and diseases, and ultimately, premature death within 1-2 years. Think of it as a mandatory hibernation for optimal health and longevity, a non-negotiable part of their natural life cycle.
How do I know my Venus Flytrap is actually dormant and not dying?
Distinguishing between dormancy and decline is a common concern for new growers. During dormancy, your Venus Flytrap will exhibit a significant reduction in growth; many of its existing traps and leaves will blacken, shrivel, and die back, often leaving only a small, tight rosette of tiny, non-functional leaves or even just the rhizome (the bulb-like base) visible at the soil surface. The key indicator of a healthy, dormant plant is a firm, pale, healthy rhizome when gently inspected. If the rhizome is soft, mushy, discolored (dark brown/black), or emits a foul odor, then the plant is likely rotting or dying. A dormant plant is simply resting and conserving energy; a dying plant is actively decaying. Always check the firmness and color of the rhizome if in doubt, as this provides the most reliable diagnosis.
What’s the ideal temperature range for Venus Flytrap dormancy?
The ideal temperature range for Venus Flytrap dormancy typically falls between 35°F and 55°F (2°C and 13°C). It’s crucial that temperatures remain consistently within this cool range for at least 3-4 months to properly induce and sustain dormancy. While they can tolerate brief dips slightly below freezing (down to about 20°F / -7°C) if the soil is not completely frozen solid for extended periods, prolonged hard freezes can be fatal, especially for potted plants where the roots are more exposed to extreme cold. Conversely, temperatures consistently above 55°F (13°C) may prevent the plant from entering or staying in dormancy properly, leading to the issues described in FAQ 1. The goal is a sustained period of cold, but not extreme freezing, to signal the plant to rest and recover.