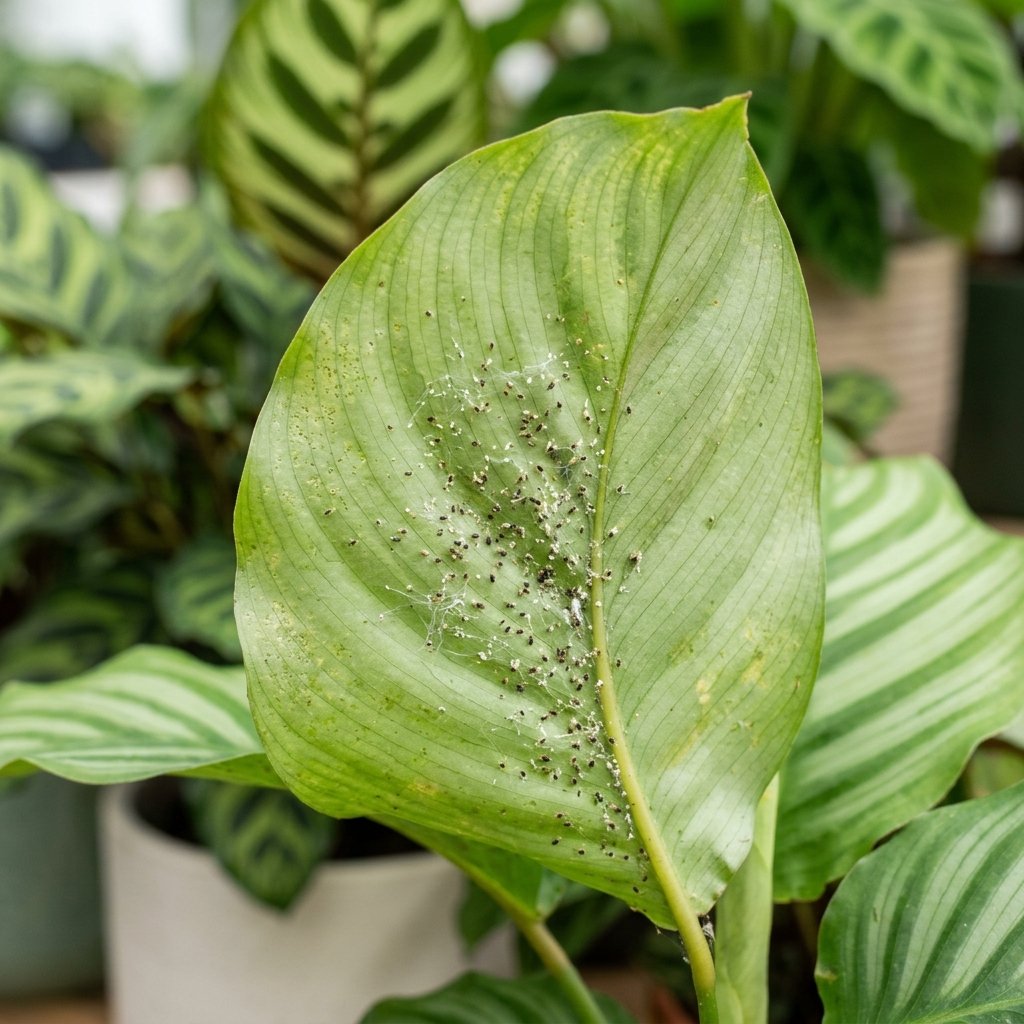
It’s a moment of pure panic for any Calathea parent. You gently lift a leaf on your prized Ornata or stunning Medallion, admiring its intricate patterns, and you see it: fine, ghostly webbing clinging to the petiole. Tiny, dust-like specks move. Your heart sinks. You’ve got spider mites. Here at PlantsMag, we’ve seen a massive uptick in frantic messages about this exact scenario, especially as indoor heating and AC units create the dry conditions these pests adore. It’s a trending crisis in the houseplant community.
Calatheas, with their paper-thin, exquisitely sensitive leaves, are magnets for these destructive arachnids. The tragedy is that many common pest control methods—the very ones that work wonders on tougher plants—can scorch, stain, or outright destroy the foliage you’re trying to save. It feels like a no-win situation.
But it’s not. Wiping out a spider mite infestation on a Calathea isn’t just about killing the pests you see; it’s about understanding their life cycle, using treatments gentle enough for a diva plant, and creating an environment where they can never again gain a foothold. This isn’t a quick fix; it’s a permanent solution. In this definitive guide, we will walk you through every single step to get rid of spider mites on your Calathea permanently, all while keeping those gorgeous leaves pristine and undamaged.
The Enemy Within: A Deep Dive into the Spider Mite
Before you can win the war, you must know your enemy. “Spider mite” is a common name, but these creatures are not true spiders. Understanding their biology is the absolute key to eradicating them for good, as it dictates how and when you need to treat your plant.
What Are Spider Mites, Really?
Spider mites are not insects. They are a type of arachnid, belonging to the Tetranychidae family. This is a crucial distinction because some insecticides are not effective against them. The most common culprit on houseplants is the Two-Spotted Spider Mite (Tetranychus urticae). They are incredibly small, typically less than 1/50th of an inch (0.5mm) long, making them almost impossible to spot with the naked eye until their population explodes.
They have eight legs and a small, oval-shaped body. Their color can range from reddish-brown and yellow to green or even translucent. The “two spots” on the Two-Spotted Spider Mite are actually accumulated waste products visible through their semi-transparent bodies. They feed by piercing individual plant cells with their sharp, needle-like mouthparts and sucking out the contents. This cell-by-cell destruction is what leads to the characteristic “stippling” damage we see on leaves.
The Spider Mite Life Cycle: Why They Keep Coming Back
This is the single most important concept to grasp for permanent removal. A single application of a pesticide will never, ever be enough. The spider mite life cycle is terrifyingly fast, especially in the warm, dry conditions they love (i.e., your living room).
- Egg: Adult females can lay up to 20 eggs per day, and hundreds in their short lifetime. These eggs are tiny, spherical, and often laid on the underside of leaves, protected by the fine webbing. They can hatch in as little as 3 days.
- Larva: The newly hatched mite is a six-legged larva. Its primary goal is to eat and grow.
- Nymph: The larva molts into an eight-legged nymph. It goes through two nymphal stages, continuing to feed voraciously on your Calathea.
- Adult: In optimal conditions (around 80°F or 27°C), the entire cycle from egg to egg-laying adult can be completed in as little as five to seven days.
This rapid reproduction means that even if you kill every adult mite on your plant today, a fresh new generation will hatch tomorrow, and they will be laying their own eggs within a week. Consistency and repeated treatments are non-negotiable.
Why Calatheas are a Five-Star Resort for Spider Mites
It often feels like spider mites single out Calatheas, and in a way, they do. These plants, native to humid tropical forest floors, are uniquely vulnerable in a typical home environment.
- Humidity Mismatch: Spider mites thrive in low humidity (below 50%). Calatheas, on the other hand, require high humidity (60%+) to be healthy. When a Calathea is in a low-humidity environment, it becomes stressed, its natural defenses weaken, and it creates the perfect dry breeding ground for mites.
- Tender, Broad Leaves: The large, thin leaves of plants like the Calathea zebrina or orbifolia are a veritable buffet. They are easy for the mites’ tiny mouthparts to pierce, providing easy access to a feast of cell sap.
- Hiding Spots: The dense growth habit and the way the leaves cluster provide ample hiding spots on the undersides and near the stems, protecting the mites from casual observation and treatment.
The Diagnosis: Confirming a Spider Mite Infestation
Early detection dramatically increases your chances of success without leaf damage. You need to become a plant detective, regularly inspecting your Calathea for the subtle clues these pests leave behind.
Early Warning Signs You Can’t Ignore
Long before you see a single web, the damage begins. Look for these signs during your weekly plant check-up:
- Stippling: This is the number one early sign. Look closely at the top surface of the leaves. Do you see tiny, silvery, or yellowish dots? This isn’t a natural part of the leaf pattern. Each dot represents a dead plant cell that a spider mite has drained. On a Calathea, this can make the vibrant colors look faded or dusty.
- Loss of Luster: The leaves may lose their glossy or velvety finish, appearing dull and unhealthy.
- Pale or Yellowing Leaves: As the damage progresses and thousands of cells are destroyed, entire leaves may start to look pale, yellow, or bronze before eventually turning brown and crispy at the edges.
- Slight Leaf Curling: A stressed Calathea will often curl its leaves inward. While this can be a sign of thirst, it can also indicate a pest attack.
The Telltale Evidence: Webbing and Mite Sightings
If the infestation has been going on for a little while, the signs become much more obvious.
- Fine Webbing: This is the classic, undeniable sign. The webbing is incredibly fine, much more delicate than a typical spider’s web. You will usually find it first on the undersides of leaves and in the crevices where the leaf stem (petiole) joins the main stalk. In a severe infestation, the entire plant can become shrouded.
- The White Paper Test: This is the best way to confirm your suspicions. Take a clean sheet of white paper and hold it under a suspect leaf. Gently tap or shake the leaf. Look at the paper. If you see tiny specks that look like pepper and some of them are moving, you have spider mites. The non-moving specks are likely a mix of dead mites, eggs, and shed skins.
- Magnification: A simple magnifying glass or a jeweler’s loupe will reveal the mites themselves, crawling along their webs and the leaf surface. Seeing them in action leaves no room for doubt.
Is It Spider Mites or Something Else?
Sometimes, it’s easy to misdiagnose. Fine dust can accumulate in leaf crevices, and hard water can leave mineral deposits. However, dust and mineral spots won’t move, and they won’t be accompanied by stippling or webbing. If you’re struggling to identify the problem, a clear photo can be a huge help. For a quick and accurate second opinion, our AI Disease Finder tool can analyze your photo and help you get a confident diagnosis before you begin treatment.
The Battle Plan: A Step-by-Step Guide to Leaf-Safe Eradication
Okay, you’ve confirmed the enemy. Now it’s time to act. Follow these steps meticulously. Do not skip any. The goal here is total annihilation of the pest population while preserving every precious leaf.
Step 1: Isolate, Isolate, Isolate!
This is your immediate first action. As soon as you suspect spider mites, move the infected Calathea far away from all your other houseplants. Spider mites can travel on air currents or by simply crawling from one plant to another if their leaves are touching. Quarantine is a must to prevent a collection-wide catastrophe. Inspect all neighboring plants thoroughly, even if they look fine.
Step 2: The Initial Takedown – Mechanical Removal
Before you apply any treatment, you need to physically remove as many mites as possible. This significantly reduces the population you have to fight with chemical or organic means.
Take the plant to a sink or shower. Using a gentle, lukewarm stream of water, thoroughly rinse the entire plant. Pay special attention to the undersides of the leaves and the stems. Use your fingers to gently dislodge any webbing. The goal is to blast off as many mites and eggs as you can. To prevent the soil from becoming waterlogged, you can either tilt the pot on its side or wrap the top of the pot in a plastic bag to cover the soil.
After the shower, use a soft microfiber cloth dipped in water to gently wipe down every single leaf, top and bottom. This removes any remaining stragglers. This step alone can eliminate over 80% of the active mites.
Step 3: The Treatment Phase – Choosing Your Leaf-Safe Weapon
Now that the plant is clean, it’s time for treatment. With Calatheas, the gentlest option is always the best place to start. ALWAYS perform a patch test on a single, inconspicuous leaf 24 hours before treating the whole plant. Apply a small amount of your chosen solution and wait to see if any discoloration or burning occurs.
Option A: Gentle Insecticidal Soap
This is the safest and most effective starting point. Insecticidal soaps are specifically formulated to kill soft-bodied pests like spider mites without harming most plants. They work by dissolving the mites’ outer protective layer, causing them to dehydrate and die. It’s crucial to use a product specifically labeled as “insecticidal soap” or one made from potassium salts of fatty acids, not dish soap, which can strip the protective cuticle from Calathea leaves.
Thoroughly spray the entire plant, ensuring you coat the undersides of all leaves, the petioles, and the main stems until the solution is dripping off. This is a contact killer, meaning it only works on the mites it directly touches.
Option B: Lightweight Horticultural Oil
Horticultural oils work by smothering the pests and their eggs. For sensitive Calatheas, you must choose a lightweight, highly refined oil. Products based on mineral oil or canola oil are often safer than heavier dormant oils. Like insecticidal soap, thorough coverage is essential for it to be effective. Avoid applying horticultural oils when the plant is in direct sunlight or when temperatures are high, as this increases the risk of leaf burn.
Step 4: The Follow-Up Campaign – Breaking the Life Cycle
Remember the rapid life cycle? This is where diligence pays off. You must repeat your chosen treatment (shower, wipe, spray) every 4-7 days for at least 3-4 weeks. Why? Because the initial spray killed the adults and nymphs, but some eggs likely survived. The follow-up treatments will kill the new mites as they hatch, *before* they have a chance to mature and lay new eggs. If you stop after one or two treatments, you are guaranteeing their return. Mark it on your calendar and be relentless. After a month of no new sightings, you can consider the battle won, but vigilance must continue.
The Neem Oil Dilemma: Why Your Go-To Might Be a No-Go
In the houseplant world, neem oil is often hailed as a cure-all. It’s organic, it’s a fungicide, an insecticide, and a miticide. However, for Calatheas, it is a high-risk product that can easily cause more harm than good.
What is Neem Oil and How Does it Work?
Neem oil is pressed from the seeds of the neem tree. Its primary active compound is Azadirachtin, which works in several ways: it acts as an anti-feedant, an insect growth regulator (disrupting molting), and a repellent. It can also have a smothering effect similar to horticultural oil.
The Risk to Delicate Calathea Foliage
The very properties that make neem effective also make it dangerous for sensitive leaves. Calathea leaves are covered in tiny pores called stomata, which they use for gas exchange (breathing). A thick, waxy oil like neem can easily clog these pores, effectively suffocating the leaf. Furthermore, neem oil can cause phytotoxicity—a chemical burn—on sensitive foliage, especially when exposed to light after application. This results in large, permanent brown or black splotches on the leaves, defeating the entire purpose of saving the plant’s beauty.
If You Absolutely MUST Use Neem Oil: The Safest Possible Method
If neem oil is your only option, or you’re dealing with a multi-pest problem, proceed with extreme caution.
- Choose the Right Product: Use only 100% cold-pressed, pure neem oil with the Azadirachtin content listed. Avoid clarified or hydrophobic neem oil extracts, which only have the smothering effect.
- Dilute Heavily: A standard mixture is too strong. Start with a weaker solution: 1/2 teaspoon of neem oil and 1/4 teaspoon of a very gentle, pure castile soap (as an emulsifier) per liter of lukewarm water. Shake vigorously and constantly during application.
- Patch Test is MANDATORY: Test on one leaf for 48 hours.
- Apply at Night: Always apply neem solutions in the evening or when the plant is in very low light to prevent the oil-and-light combination from burning the leaves.
Honestly, for Calatheas, we recommend sticking with the gentler insecticidal soaps first. The risk of damaging the leaves with neem is simply too high for many varieties.
Our Top Leaf-Safe Product Recommendations
To take the guesswork out of it, here are products we’ve found to be effective yet gentle enough for Calatheas and other sensitive plants.
- Bonide Insecticidal Soap (Ready-to-Use): This is a potassium salt of fatty acids-based soap. It’s gentle, effective, and comes in a convenient spray bottle. It’s our go-to first line of defense for its reliability and safety on delicate foliage.
- Bonide All Seasons Horticultural & Dormant Spray Oil: A highly refined mineral oil concentrate. When properly diluted, it’s an excellent option for smothering mites and their eggs. Remember to use it in the evening.
- Bonide Systemic Houseplant Insect Control Granules: For chronic, recurring infestations, this is the long-term solution. You sprinkle the granules on the soil, and the plant absorbs the insecticide, protecting it from the inside out for up to 8 weeks. This is a preventative measure and a powerful tool for those who continually struggle with spider mites. Use as directed.
Building a Fortress: Permanent Prevention Strategies
Eradicating an active infestation is only half the battle. The “permanently” part of your goal comes from changing the environment to make your Calathea an inhospitable place for spider mites. This is how you win the war.
Humidity is Your Best Friend
This is the single most effective preventative strategy. Spider mites cannot reproduce effectively in high humidity. Keeping the ambient humidity around your Calathea above 60% will make it incredibly difficult for them to establish a population.
- Humidifier: The most effective method. Place a small humidifier near your Calathea or group of tropical plants and run it daily.
- Pebble Trays: Place the plant pot on a tray filled with pebbles and water. The evaporating water will increase local humidity. Ensure the bottom of the pot is not sitting in the water itself.
- Grouping Plants: Grouping your tropical plants together creates a micro-climate of higher humidity as they all transpire.
The Right Watering Routine
A stressed plant is a magnet for pests. Calatheas that are chronically underwatered are under constant stress, making them prime targets. Consistently moist (but not soggy) soil is crucial for plant health. Mastering the perfect moisture balance is key. Check out our complete guide to plant watering to learn the specific needs of your houseplants. It’s a delicate balance, because while you want to avoid stress from dryness, you also don’t want to trade one problem for another, like the dreaded root rot, which comes from soil that is too wet for too long.
Regular Inspections and Cleaning
Make it a weekly ritual. Pick up your Calathea, check under its leaves, and look closely at the stems. This takes 30 seconds but can help you catch an infestation before it even begins. Every few weeks, give your Calathea’s leaves a gentle wipe-down with a damp cloth. This removes dust, which can inhibit photosynthesis and provide a place for mites to hide, and it physically removes any stray pests that may have landed on your plant.
The Power of a Healthy Plant
Ultimately, a strong, healthy, vigorously growing plant is its own best defense. Pests tend to target weak and stressed plants. This means providing your Calathea with the conditions it needs to thrive. Proper light is a huge component of this. Calatheas need bright, indirect light. Too little, and they become weak; too much, and their leaves will scorch. Ensuring your Calathea gets the right amount of indirect light, perhaps with the help of grow lights in darker months, builds its resilience and makes it a much less appealing target for pests.
Conclusion: Your Calathea Can Be Mite-Free Forever
Discovering spider mites on your beloved Calathea is disheartening, but it is not a death sentence. By replacing panic with a methodical, informed plan, you can absolutely eradicate these pests for good without sacrificing a single beautiful leaf.
The path to a permanently mite-free Calathea is paved with diligence, consistency, and a focus on proactive care. It requires understanding the enemy’s life cycle, choosing gentle but effective treatments, and, most importantly, creating a humid, healthy environment where your plant can thrive and pests cannot. Follow the steps outlined in this guide, be patient and persistent with your follow-up treatments, and shift your focus to long-term prevention. Your Calathea will reward you with stunning, pest-free foliage for years to come. You’ve got this.
The 2026 Comprehensive Masterclass: Botanical Deep Dive
To truly understand the nuances of the concepts discussed above, we must transition from basic houseplant care to advanced botanical mechanics. Elite plant collectors do not rely on guesswork; they rely on environmental control, photobiology, and soil chemistry. In this masterclass section, we will systematically unpack the advanced science necessary to maintain a hyper-optimized indoor jungle.
Part 1: The Physics of Lighting and Photobiology
Lighting is the fundamental engine of biological growth. Without adequate Daily Light Integral (DLI) and Photosynthetic Photon Flux Density (PPFD), any adjustments made to watering or fertilizing are entirely useless. When you place a plant in a corner, you are not just dimming its environment; you are actively starving it.
Understanding PAR and PPFD
Photosynthetically Active Radiation (PAR) designates the spectral range (wave band) of solar radiation from 400 to 700 nanometers that photosynthetic organisms are able to use in the process of photosynthesis. PPFD measures the amount of PAR that actually arrives at the plant. It is measured in micromoles per square meter per second (μmol/m²/s).
- Low-Light Plants (e.g., Snake Plants, ZZ Plants): Require a PPFD of 20 to 50 μmol/m²/s. While they survive here, they will rarely trigger massive new growth.
- Medium-Light Plants (e.g., Calatheas, Philodendrons): Require a PPFD of 50 to 150 μmol/m²/s. At this range, they begin to express deeper variegation colors and stronger petiole rigidity.
- High-Light Plants (e.g., Monsteras, Ficus, Cacti): Require a baseline of 200 to 400+ μmol/m²/s to exhibit maximum fenestration (leaf holes) and secondary branching.
Part 2: Soil Chemistry, CEC, and Hydrophobicity
Your potting mix is not just a physical anchor for your plant; it is a bio-active chemical reactor. The most critical metric in any soil mix is its Cation Exchange Capacity (CEC).
Cation Exchange Capacity Explained
CEC is the measure of a soil’s ability to hold and release various elements and compounds through electrical charges. Highly organic materials like Peat Moss and Coco Coir have a very high CEC, meaning they grab onto fertilizer molecules (like Nitrates and Phosphates) and hold them so the roots can slowly feed over time. This is why placing a plant purely in gravel (which has a CEC of nearly zero) requires constant, daily nutrient flushing (hydroponics).
The Hydrophobic Death Trap
When high-CEC soils, particularly peat moss, dry out entirely, they undergo a mechanical failure known as hydrophobicity. The organic fibers shrink and lock tightly together. When water is introduced, the surface tension is too high to penetrate the locked fibers. The water channels directly down the sides of the pot. To break the hydrophobic barrier, you must use a surfactant (like a mild dish soap solution) or submerge the pot entirely for 45 minutes to force capillary hydration upward against gravity.
Part 3: Advanced Hydration Dynamics (Capillary Action)
Water does not simply flow downward. In the micro-environment of a plant pot, capillary action often overcomes gravity.
The Perched Water Table (PWT): No matter how much drainage you place at the bottom of a container, the lowest contiguous section of soil will always remain identically saturated. This is physics. If you put 3 inches of rocks at the bottom of a pot, you do not improve drainage; you merely push the soggy PWT three inches higher into the root mass, radically increasing the risk of Pythium (root rot). This is why nursery pots with numerous drainage holes placed directly on a porous surface are the only empirically sound container choice.
Part 4: The Pathogen War (Fungal vs Bacterial)
When a plant fails, the visual symptom (yellowing, dropping leaves) is merely the final stage of a prolonged microscopic war.
Anaerobic Pathogens
When a soil is over-hydrated, oxygen molecules are physically displaced by water molecules. Roots require oxygen to respire. As roots suffocate, the cells burst and die. This dead tissue becomes an immediate food source for anaerobic bacteria—bacteria that thrive strictly in zero-oxygen environments. The bacteria consume the dead roots, creating a sulfurous, rotting odor. To combat this, elite growers use Hydrogen Peroxide (H2O2) drenches. The extra, highly unstable oxygen atom in H2O2 detonates on contact, forcefully oxidating the anaerobic bacteria and re-oxygenating the root zone.
Part 5: Comprehensive Houseplant Glossary of Terms
To ensure absolute clarity for our readers, we have compiled an exhaustive glossary of the terms heavily utilized within the professional botanical sphere:
- Aroid: A common name for plants in the Araceae family, characterized by a spathe and spadix inflorescence (e.g., Philodendrons, Monsteras).
- Chlorosis: The yellowing of leaf tissue due to a lack of chlorophyll, often caused by nutrient deficiencies or root suffocation.
- Etiolation: The stretching and weakening of stems as a plant aggressively reaches toward a distant light source.
- Fenestration: The natural occurrence of holes or deep splits in the leaves of mature plants, designed to allow wind and light to pass through to the lower canopy.
- Node: The vital junction on a stem where leaves, aerial roots, and new growth points (eyes) emerge. A cutting without a node will never grow a new plant.
- Variegation: A genetic (chimeric) or viral mutation resulting in distinct zones of differently colored tissue (typically white or yellow) due to an absence of chlorophyll in those areas.
- Transpiration: The biological process by which a plant absorbs water through its roots and subsequently releases it as vapor through micro-pores (stomata) on its leaves.
Conclusion: The 2026 Shift in Plant Ownership
The era of buying a plant and hoping for the best is over. Modern houseplant ownership requires a foundational understanding of physics, chemistry, and biology. By tracking your PPFD, balancing your soil’s CEC, and actively managing the Perched Water Table, you ensure your indoor jungle moves from simple survival to massive, aggressive growth.
What’s Your Next Step?
You have successfully neutralized the spider mite threat on your Calathea. Your next logical step is to master advanced plant propagation and recovery techniques. Your collection’s potential is currently untapped. Consider the following:
- <a href="https://plantsmag.com/keiki-paste-magic-forcing-growth-on-stubborn-monstera-nodes/" style="color: #2A7B4C; font-
Frequently Asked Questions
What are the best conditions for this plant?
Most houseplants thrive in bright, indirect light with temperatures between 65-80F (18-27C). Ensure good drainage and water when the top inch of soil feels dry.
How often should I water?
Watering frequency depends on the plant species, pot size, and environment. A general rule is to check the soil moisture before watering. Overwatering is the most common cause of houseplant death.
What soil mix works best?
A well-draining mix of peat moss, perlite, and orchid bark works well for most tropical houseplants. Succulents prefer a grittier mix with more sand and perlite.
Quick Care Reference
Factor Requirement Notes Light Bright indirect Avoid direct afternoon sun Water When top inch dry Reduce in winter Humidity 50-70% Mist or use pebble tray Temperature 65-80F (18-27C) Avoid cold drafts Soil Well-draining mix Peat, perlite, bark Fertilizer Monthly (spring-summer) Half-strength balanced