Welcome to the future of indoor gardening. If you’ve spent any time in the online plant community recently, you’ve felt the seismic shift. The whispers are growing louder, the Instagram feeds are filling with terracotta-colored clay balls, and the term ‘semi-hydroponics’ is on everyone’s lips. This isn’t just a fleeting trend; it’s the beginning of the 2026 Hydroponic Houseplant Revolution, a movement towards cleaner, more controlled, and ultimately more rewarding plant parenthood. And at the heart of this revolution is one of the most beloved houseplants of all time: the magnificent Monstera deliciosa.
But with great change comes great fear. The number one question we see from concerned plant parents is, “How do I move my prized, soil-grown Monstera into LECA without it dying?” It’s a valid concern, often accompanied by horror stories of “melting roots” and sudden plant collapse. Fear not. This comprehensive guide is your definitive roadmap to success. We’re going to demystify the process, dive deep into the science, and provide a step-by-step methodology for transitioning your Monstera to LECA without melting roots. By the end of this article, you’ll be armed with the knowledge and confidence to lead your own houseplants into this exciting new era.
The Science: Why Semi-Hydroponics is More Than Just “Plants in Water”
Before we get our hands dirty (or, in this case, clean), it’s crucial to understand the fundamental difference between growing in soil and growing in a semi-hydroponic medium like LECA. The success of your transition hinges on appreciating this biological shift from your plant’s perspective.
Soil vs. Semi-Hydroponics: A Tale of Two Root Systems
For millennia, soil has been the default medium for plants. It provides anchorage, a reservoir for water, and a complex ecosystem of microbes that break down organic matter into usable nutrients. However, soil also has its downsides: it can compact over time, reducing oxygen flow; it can harbor pests like fungus gnats; and it can create an environment ripe for devastating fungal and bacterial diseases.
Semi-hydroponics, specifically using LECA (Lightweight Expanded Clay Aggregate), flips the script. LECA is an inert medium. It contains no organic matter and no nutrients. It’s essentially a sterile, porous, and structurally stable substrate. Its primary jobs are to anchor the plant and to act as a wicking system for water and nutrients.
This fundamental difference forces the plant to adapt in a profound way, starting with its roots. This leads to the concept of “soil roots” versus “water roots.”
- Soil Roots: These are the roots your Monstera has now. They are typically thicker, woodier, and covered in fine, fuzzy root hairs. Their job is to push through a dense medium, actively seeking out pockets of water and nutrients. They are adapted to periods of wet and dry.
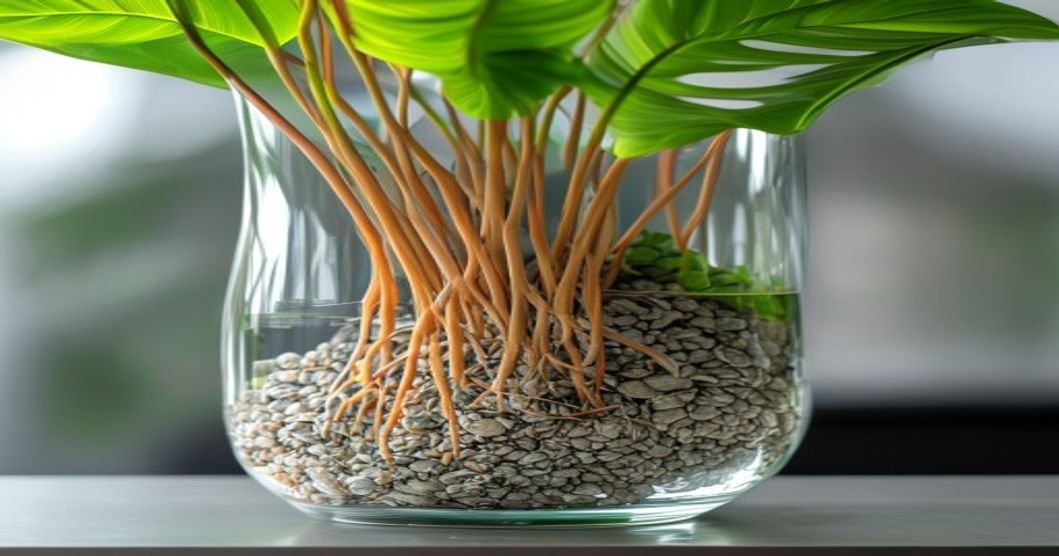
- Water Roots: These are the roots your Monstera will grow in LECA. They are finer, smoother, more delicate, and often brighter white. They don’t need to search for water; it’s constantly available via capillary action. Their structure is optimized for absorbing oxygen and nutrients directly from the water solution.
The core challenge of the transition is that soil roots are not well-equipped to survive in a constantly wet, hydroponic environment. This is the biological crux of why so many transitions fail.
The Great Transition: Why Monstera Roots “Melt”
“Melting roots” is the colloquial term for the rapid, mushy decay of a plant’s root system during the transition from soil to a hydroponic setup. It’s a form of root rot, but it happens with terrifying speed. Understanding the ‘why’ is the first step to preventing it.
The Shock of a New World: From Soil to Water
Imagine being adapted to breathe air your whole life and then suddenly being submerged in water. This is the shock your Monstera’s soil roots experience. In soil, even when watered, there are air pockets that provide essential oxygen. When you submerge these roots in a hydroponic system, they are suddenly deprived of the oxygen levels they are accustomed to. The cells begin to suffocate, die, and decay. This decay creates a breeding ground for opportunistic bacteria and fungi, which accelerates the rot, leading to the “melting” phenomenon.
This is the most common and dangerous pitfall for beginners. Preventing it is about managing moisture and oxygen availability during the critical first few weeks. If you’ve ever struggled with this issue, our deep dive on understanding and treating root rot provides essential background knowledge.
The Microbial Battlefield
Soil is a living ecosystem teeming with billions of microorganisms. Many of these are beneficial, forming a symbiotic relationship with the plant’s roots and protecting them from pathogens. When you unpot your Monstera and meticulously wash every speck of soil from its roots, you are stripping away this entire protective biome. The roots are left naked and vulnerable in a new, sterile environment. Any microscopic piece of decaying organic matter (a tiny remnant of soil or a damaged root tip) can become an infection site for rot-causing pathogens that thrive in low-oxygen, high-moisture environments.
This is why the cleaning process is a double-edged sword: it’s absolutely necessary to remove soil, but it’s also incredibly stressful for the plant and its roots.
Your Foundation for Success: Preparing the LECA
You cannot simply open a bag of LECA and use it. Proper preparation is non-negotiable and sets the stage for a healthy, rot-free transition. Think of this as sterilizing your surgical equipment before an operation.
Step 1: The Triple Wash – Removing Dust and Debris
LECA pebbles are tumbled and transported, creating a significant amount of fine red dust and clay debris. This dust is your enemy. If not removed, it will form a sludge at the bottom of your reservoir, clogging the LECA pores, reducing airflow, and creating an anaerobic (oxygen-free) sludge perfect for root rot.
The Process: Place your LECA in a colander or sieve. Rinse it thoroughly under running water, agitating the pebbles with your hands. You’ll see a torrent of red, cloudy water. Keep rinsing until the water runs completely clear. Do it once, twice, and then a third time to be absolutely certain.
Step 2: The 24-Hour Soak – Full Saturation is Key
Dry LECA is intensely thirsty. If you put your plant’s delicate, stressed roots into dry or semi-dry LECA, the clay balls will act like a desiccant, wicking precious moisture away from the roots, causing them to dry out and die. You must fully saturate the LECA before it ever touches your plant.
The Process: After the final rinse, place the clean LECA in a bucket or large bowl and cover it completely with water. Let it soak for a minimum of 12 hours, but a full 24 hours is ideal. You’ll notice the pebbles become darker and heavier as they absorb water.
Step 3: The Final Boil (Optional but Highly Recommended)
For maximum security, especially if you’re transitioning a valuable or sentimental Monstera, a final sterilization step is worth the effort. Boiling the soaked LECA will kill any lingering bacteria, fungal spores, or pest eggs that may have been present in the bag.
The Process: After soaking, drain the LECA and transfer it to a large stockpot. Cover with fresh water and bring to a rolling boil for 10-15 minutes. Carefully drain the boiling water and spread the LECA on a tray to cool completely. Never use hot or even warm LECA with your plant.
The Physics of LECA: Understanding CEC and Capillary Action
To truly master semi-hydroponics, you need to understand two key scientific principles that govern how LECA works. This knowledge will transform you from a follower of instructions to a confident hydroponic gardener who can troubleshoot any problem.
Capillary Action: How LECA Waters Your Plant for You
Capillary action is the ability of a liquid to flow in narrow spaces without the assistance of, or even in opposition to, external forces like gravity. It’s the same principle that allows a paper towel to suck up a spill. The porous structure of LECA creates a network of tiny channels. When the bottom layer of LECA sits in a nutrient-water reservoir, this water is wicked upwards, from pebble to pebble, against gravity.
This is the magic of the system. It creates a gradient of moisture within the pot. The LECA at the bottom is fully saturated, while the LECA at the top is only lightly moist, with plenty of air-filled gaps. This allows the Monstera’s new roots to grow downwards, finding the perfect balance of moisture and oxygen they need. This is a revolutionary step in plant hydration, moving beyond traditional soil-based methods. For a refresher on traditional techniques, you can explore our guide to plant watering.
Cation Exchange Capacity (CEC): LECA’s Secret Superpower
This sounds complex, but the concept is simple. Cation Exchange Capacity (CEC) is a measure of a material’s ability to hold onto positively charged nutrient ions (cations) like Calcium (Ca²+), Magnesium (Mg²+), and Potassium (K+), and then release them for plant uptake.
Soil, with its clay and organic matter, has a relatively high CEC. It acts like a nutrient pantry, holding onto fertilizers and releasing them slowly. LECA, being baked clay, has an extremely low CEC. At first, this sounds like a disadvantage, but in hydroponics, it’s a huge asset.
A low CEC means the LECA itself doesn’t bind to or store nutrients. It does not interfere. This gives YOU, the grower, 100% control. Every nutrient your plant receives comes directly from the solution you provide. There’s no risk of salt or mineral buildup in the substrate itself, a common problem in potted soil plants that leads to nutrient lockout and root burn. You are in the driver’s seat of your plant’s nutrition.
🌱 Great Value Plant Gear
Need multiple pots for your growing collection? We recommend the QRRICA Self Watering Pots (Set of 5). Excellent value and reliable drainage.
The Step-by-Step Monstera to LECA Transition Guide
Alright, your LECA is prepped, you understand the science, and your tools are ready. It’s time for the main event. Take a deep breath. Be patient and methodical. This is a delicate operation.
Phase 1: The Unpotting and Meticulous Root Cleaning
This is the most critical and labor-intensive step. Your goal is to remove 100% of the old soil and organic debris.
1. Unpot Gently: The day before, water your Monstera normally. This makes the soil easier to work with. Gently remove the plant from its pot. Massage the root ball to loosen as much soil as possible.
2. The First Wash: Use a gentle stream of lukewarm water to wash away the bulk of the soil. A hose nozzle on a gentle setting or a kitchen sink sprayer works well.
3. The Detail Work: Now, the patient part. Using your fingers, a soft-bristled toothbrush, or a chopstick, meticulously remove every last speck of soil from between the roots. This can take a long time for a large plant. Be thorough. Any remaining soil is a potential site for rot.
4. Inspect and Prune: With the roots completely clean, you can inspect them. Trim off any roots that are already black, mushy, or stringy. Use sterile scissors or pruning shears. If you’re unsure whether a root is healthy or diseased, our AI-powered Disease Finder tool can help you analyze visual symptoms before you proceed.
Phase 2: The Potting Process
You’ll be using a two-pot system: an inner net pot that holds the plant and LECA, and an outer cache pot that holds the water reservoir.
1. Create a Base: Fill the bottom of your net pot with a 1-2 inch layer of your prepared LECA.
2. Position the Plant: Hold your Monstera in the center of the pot at the desired height. The base of the plant should be slightly below the rim of the pot.
3. Backfill with LECA: Gently pour LECA in and around the roots. Vibrate and gently shake the pot as you go to help the pebbles settle into all the crevices. Do not compact the LECA or force it, as this can damage the delicate roots. Fill until the roots are covered and the plant is stable.
Phase 3: The Initial “Shower” and Reservoir Establishment
This step settles the LECA and gives the roots their first taste of their new environment.
1. Flush the System: Take the entire potted plant (in its net pot) to the sink. Pour fresh, pH-balanced water (ideally around 6.0 pH) through the LECA for about a minute. This rinses away any final dust and ensures all pebbles are moist.
2. Create the Reservoir: Place the net pot inside its cache pot. Fill the cache pot with your pH-balanced water until the water level is about one-third of the way up the height of the net pot. It is critical that the main root mass and the base of the plant are NOT submerged in this reservoir. Only the very bottom layer of LECA and the lowest root tips should be touching the water. Capillary action will do the rest.
Phase 4: The Critical First Month – Nutrients and Patience
Your plant is now in the ICU. It needs to heal from the stress of the transition and begin growing new water roots.
1. No Nutrients (Weeks 1-3): For the first 2-3 weeks, use only plain, pH-balanced water in your reservoir. The plant’s damaged soil roots cannot process nutrients effectively, and adding them now will only encourage algae and bacterial growth. The plant has enough stored energy to survive this period.
2. Introduce Nutrients Slowly: Around week 3 or 4, once you see signs of new, white, fuzzy water roots emerging, you can start adding a hydroponic nutrient solution at a very weak, 1/4 strength dilution.
3. Weekly Flushing: For the first month, it’s good practice to take the inner pot to the sink once a week and flush the entire system with fresh water. This removes any metabolic waste from the plant, prevents bacterial buildup, and re-oxygenates the root zone. Then, re-establish your reservoir.
Fueling the Transition: The Importance of Light (DLI & PPFD)
We’ve focused intensely on the roots, but we can’t forget the engine that powers their growth: the leaves. Transitioning is an incredibly energy-intensive process. The plant has to sustain its existing foliage while simultaneously building an entirely new root system. The energy for this monumental task comes from one place: photosynthesis. And photosynthesis requires light.
Understanding Your Plant’s Energy Needs
Providing your Monstera with inadequate light during this transition is like asking a marathon runner to compete on a bread-and-water diet. The plant simply won’t have the energy reserves to heal, adapt, and grow new roots. It will languish, and the old soil roots will rot away faster than new water roots can be created. This is a common, and often overlooked, reason for transition failure. You must provide optimal light to fuel the recovery.
DLI and PPFD: Decoding the Light Lingo
To provide optimal light, we need to move beyond vague terms like “bright, indirect light” and speak the language of photons.
- PPFD (Photosynthetic Photon Flux Density): This measures the intensity of light hitting the plant at any given moment. It’s measured in micromoles per square meter per second (μmol/m²/s).
- DLI (Daily Light Integral): This measures the total amount of light the plant receives over a 24-hour period. It’s the combination of intensity (PPFD) and duration.
For a Monstera undergoing the stress of transition, you should aim for the higher end of its preferred light range. A target PPFD of 200-400 μmol/m²/s for a duration of 10-12 hours per day is ideal. While a bright window might achieve this, it can be inconsistent. The single best way to guarantee your plant has the energy it needs is to use a quality full-spectrum LED grow light. This provides consistent, powerful, and targeted light, day in and day out, eliminating one of the biggest variables in your plant’s recovery. If you’re new to supplemental lighting, our comprehensive guide to choosing and using grow lights is the perfect place to start.
Conclusion: Embracing the Future of Houseplant Care
The journey from soil to LECA is a significant undertaking, but it is far from impossible. The 2026 Hydroponic Houseplant Revolution is built on a foundation of knowledge, patience, and a willingness to embrace a more scientific approach to plant care. By understanding the critical differences between soil and water roots, meticulously preparing your medium, respecting the plant’s need for energy through light, and having the patience to allow it to adapt, you can virtually eliminate the risk of “melting roots.”
Your reward will be a thriving Monstera with a robust, rot-resistant root system. You’ll gain freedom from soil-borne pests, a more forgiving watering schedule, and an unparalleled level of control over your plant’s nutrition and health. You are no longer just a plant owner; you are a Cation Exchange Capacity-calculating, PPFD-measuring, hydroponic architect of your own indoor jungle. Welcome to the revolution.
The 2026 Comprehensive Masterclass: Botanical Deep Dive
To truly understand the nuances of the concepts discussed above, we must transition from basic houseplant care to advanced botanical mechanics. Elite plant collectors do not rely on guesswork; they rely on environmental control, photobiology, and soil chemistry. In this masterclass section, we will systematically unpack the advanced science necessary to maintain a hyper-optimized indoor jungle.
Part 1: The Physics of Lighting and Photobiology
Lighting is the fundamental engine of biological growth. Without adequate Daily Light Integral (DLI) and Photosynthetic Photon Flux Density (PPFD), any adjustments made to watering or fertilizing are entirely useless. When you place a plant in a corner, you are not just dimming its environment; you are actively starving it.
Understanding PAR and PPFD
Photosynthetically Active Radiation (PAR) designates the spectral range (wave band) of solar radiation from 400 to 700 nanometers that photosynthetic organisms are able to use in the process of photosynthesis. PPFD measures the amount of PAR that actually arrives at the plant. It is measured in micromoles per square meter per second (μmol/m²/s).
- Low-Light Plants (e.g., Snake Plants, ZZ Plants): Require a PPFD of 20 to 50 μmol/m²/s. While they survive here, they will rarely trigger massive new growth.
- Medium-Light Plants (e.g., Calatheas, Philodendrons): Require a PPFD of 50 to 150 μmol/m²/s. At this range, they begin to express deeper variegation colors and stronger petiole rigidity.
- High-Light Plants (e.g., Monsteras, Ficus, Cacti): Require a baseline of 200 to 400+ μmol/m²/s to exhibit maximum fenestration (leaf holes) and secondary branching.
Part 2: Soil Chemistry, CEC, and Hydrophobicity
Your potting mix is not just a physical anchor for your plant; it is a bio-active chemical reactor. The most critical metric in any soil mix is its Cation Exchange Capacity (CEC).
Cation Exchange Capacity Explained
CEC is the measure of a soil’s ability to hold and release various elements and compounds through electrical charges. Highly organic materials like Peat Moss and Coco Coir have a very high CEC, meaning they grab onto fertilizer molecules (like Nitrates and Phosphates) and hold them so the roots can slowly feed over time. This is why placing a plant purely in gravel (which has a CEC of nearly zero) requires constant, daily nutrient flushing (hydroponics).
The Hydrophobic Death Trap
When high-CEC soils, particularly peat moss, dry out entirely, they undergo a mechanical failure known as hydrophobicity. The organic fibers shrink and lock tightly together. When water is introduced, the surface tension is too high to penetrate the locked fibers. The water channels directly down the sides of the pot. To break the hydrophobic barrier, you must use a surfactant (like a mild dish soap solution) or submerge the pot entirely for 45 minutes to force capillary hydration upward against gravity.
Part 3: Advanced Hydration Dynamics (Capillary Action)
Water does not simply flow downward. In the micro-environment of a plant pot, capillary action often overcomes gravity.
The Perched Water Table (PWT): No matter how much drainage you place at the bottom of a container, the lowest contiguous section of soil will always remain identically saturated. This is physics. If you put 3 inches of rocks at the bottom of a pot, you do not improve drainage; you merely push the soggy PWT three inches higher into the root mass, radically increasing the risk of Pythium (root rot). This is why nursery pots with numerous drainage holes placed directly on a porous surface are the only empirically sound container choice.
Part 4: The Pathogen War (Fungal vs Bacterial)
When a plant fails, the visual symptom (yellowing, dropping leaves) is merely the final stage of a prolonged microscopic war.
Anaerobic Pathogens
When a soil is over-hydrated, oxygen molecules are physically displaced by water molecules. Roots require oxygen to respire. As roots suffocate, the cells burst and die. This dead tissue becomes an immediate food source for anaerobic bacteria—bacteria that thrive strictly in zero-oxygen environments. The bacteria consume the dead roots, creating a sulfurous, rotting odor. To combat this, elite growers use Hydrogen Peroxide (H2O2) drenches. The extra, highly unstable oxygen atom in H2O2 detonates on contact, forcefully oxidating the anaerobic bacteria and re-oxygenating the root zone.
Part 5: Comprehensive Houseplant Glossary of Terms
To ensure absolute clarity for our readers, we have compiled an exhaustive glossary of the terms heavily utilized within the professional botanical sphere:
- Aroid: A common name for plants in the Araceae family, characterized by a spathe and spadix inflorescence (e.g., Philodendrons, Monsteras).
- Chlorosis: The yellowing of leaf tissue due to a lack of chlorophyll, often caused by nutrient deficiencies or root suffocation.
- Etiolation: The stretching and weakening of stems as a plant aggressively reaches toward a distant light source.
- Fenestration: The natural occurrence of holes or deep splits in the leaves of mature plants, designed to allow wind and light to pass through to the lower canopy.
- Node: The vital junction on a stem where leaves, aerial roots, and new growth points (eyes) emerge. A cutting without a node will never grow a new plant.
- Variegation: A genetic (chimeric) or viral mutation resulting in distinct zones of differently colored tissue (typically white or yellow) due to an absence of chlorophyll in those areas.
- Transpiration: The biological process by which a plant absorbs water through its roots and subsequently releases it as vapor through micro-pores (stomata) on its leaves.
Conclusion: The 2026 Shift in Plant Ownership
The era of buying a plant and hoping for the best is over. Modern houseplant ownership requires a foundational understanding of physics, chemistry, and biology. By tracking your PPFD, balancing your soil’s CEC, and actively managing the Perched Water Table, you ensure your indoor jungle moves from simple survival to massive, aggressive growth.
<div class='pm-retention-hook' style='background-color: #f8fafc; border-left: 4px solid #2A7B4C; padding: 20px; margin-top: 40px;
Frequently Asked Questions
What are the best conditions for this plant?
Most houseplants thrive in bright, indirect light with temperatures between 65-80F (18-27C). Ensure good drainage and water when the top inch of soil feels dry.
How often should I water?
Watering frequency depends on the plant species, pot size, and environment. A general rule is to check the soil moisture before watering. Overwatering is the most common cause of houseplant death.
What soil mix works best?
A well-draining mix of peat moss, perlite, and orchid bark works well for most tropical houseplants. Succulents prefer a grittier mix with more sand and perlite.
Quick Care Reference
| Factor | Requirement | Notes |
|---|---|---|
| Light | Bright indirect | Avoid direct afternoon sun |
| Water | When top inch dry | Reduce in winter |
| Humidity | 50-70% | Mist or use pebble tray |
| Temperature | 65-80F (18-27C) | Avoid cold drafts |
| Soil | Well-draining mix | Peat, perlite, bark |
| Fertilizer | Monthly (spring-summer) | Half-strength balanced |